
Tool presets
Save a tool's options as a named preset, switch between presets in one click, reset tools to their defaults, and export or import presets.
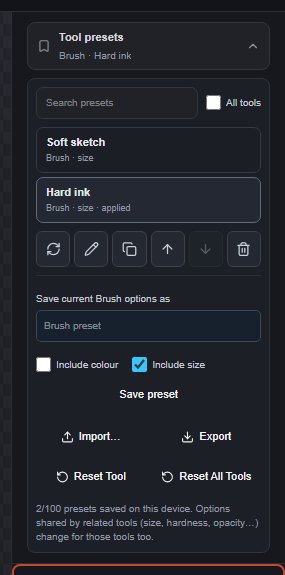
A tool preset stores the options of one tool under a name, such as "Soft sketch" for a large soft brush or "Hard ink" for a small hard one. Pick the preset later to set all those options at once.
#Which tools have presets
Tools with options show a Tool presets button at the top of their options in the sidebar: painting and retouching tools, the eraser tools, Gradient, the Horizontal Type tool, every shape tool (Rectangle, Rounded Rectangle, Ellipse, Line, Polygon and Custom Shape), and the marquee, lasso and selection tools. The button shows the tool name and the preset in use, with Modified when you have changed the options since applying it.
Shape tool presets store the colour and size; Polygon presets add the variant, number of sides and star inner radius, Rounded Rectangle presets add the Corner radius, and Custom Shape presets add the chosen shape (a built-in shape or one of your saved paths on this device; if that saved path is deleted later, the tool falls back to the built-in library).
Smudge presets also store Strength, Mode, Finger painting, Sample all layers, Ignore adjustment layers and Pressure affects strength, plus the tip and dynamics controls shown for Smudge (Angle, Roundness, Scatter, Count and the jitters, Bristle, Texture, Pressure affects size, Pressure curve and Symmetry). Spot Healing presets store the Type, Patch presets the Patch mode, and Adjustment Brush presets the Paint mode (Reveal or Conceal). Brush presets also store the Silk strands options (on or off, Strands, Strand thickness, Twists, Wobble, Strand opacity jitter and Seed), so a Brush preset saved with Silk strands off turns them off again, for example after you chose the Silk smoke brush preset. Presets saved before these options existed apply their defaults.
Tools without stored options, such as Move, Hand, Zoom, Crop and the Pen tools, have no presets.
#Save a preset
- Set up the tool the way you want.
- Click Tool presets to open the panel.
- Under Save current … options as, enter a name.
- Choose what to include:
- Include colour: also store the foreground and background colours (off by default, only for tools that use them).
- Include size: also store the brush size, or the font size for type (on by default).
- Click Save preset.
Values you don't include are neither saved nor changed when you apply the preset.
#Apply a preset
Open the panel and click a preset. The list shows the presets for the current tool; tick All tools to see every preset, and use Search presets to filter by name or tool. Choosing another tool's preset switches to that tool first.
Applying a preset changes tool settings only, never your document, so it adds nothing to the history.
#Manage presets
Select a preset in the list, then use the buttons below it:
| Button | Action |
|---|---|
| Update preset from current options | Save the tool's current options into the selected preset (same tool only). |
| Rename preset | Rename it in place. |
| Duplicate preset | Make a copy named "… copy". |
| Move preset up / down | Change the order. You can also drag presets on a desktop, or press Alt+↑ / ↓. |
| Delete preset | Delete it, after a confirmation. |
#Reset tools
- Reset Tool puts the current tool's options back to their defaults.
- Reset All Tools does the same for every tool.
Both ask for confirmation first. They keep your saved presets and do not change your colours.
#Export and import
- Export downloads your presets as
pixelforge-tool-presets.json, settings only. - Import… reads such a file (up to 512 KB). Invalid presets are skipped and counted; nothing already on this device is overwritten.
Presets are stored in this browser (up to 100). They are not part of documents or project files. Use Export and Import to move them to another browser or device.
Still stuck? See Troubleshooting or report a problem.