
Add, duplicate and arrange layers
Add new layers, duplicate, rename and delete them, and change their stacking order by dragging, with keyboard shortcuts or with Move to Position.
New layers keep parts of your work separate, so you can change one part without touching the rest. This article covers creating, copying, renaming, deleting and reordering layers.
#Add a layer
New layers are added directly above the selected layer, inside its folder if it is in one.
- Paint layer: click Add paint layer under the layer list, or choose Layer > New Paint Layer. PixelForge switches to the Brush so you can paint straight away.
- Image layer: click Add image layer and choose an image file. It is added at its original size, centred in the document, like a file dropped outside the canvas. Use the Move tool to position it.
- Drop files: drag image files from your computer onto the canvas. Each file becomes a layer centred where you drop it, all in one undo step. Drop files on the layer list to insert them at a chosen position. Hold Shift while dropping to open the first file as a new document instead.
- Other types: see Layer types for fill, adjustment, text, shape and smart object layers.
Files you add this way can be up to 64 MB each. Phone browsers do not support dragging files; use Add image layer instead. See Open and place files for supported formats.
#Duplicate a layer
Select one or more layers and do one of the following:
- press Ctrl+J (⌘+J on Mac);
- choose Layer > Duplicate Layer;
- click Duplicate layer under the layer list;
- choose Duplicate in the row menu.
Each copy is placed directly above its original, named with "copy" added, and is unlocked. Locked layers cannot be duplicated until you unlock them.
You can also copy a layer with Edit > Copy Layer and add it again with Edit > Paste Layer.
#Rename a layer
Select the layer and type in the Layer name field of the Layers panel. Layer > Rename Layer… puts the cursor in that field. You can also choose Rename… in the row menu.
#Delete a layer
Select the layer, then click its trash button, click Delete layer under the list, choose Layer > Delete Layer or press Delete while its row has keyboard focus. If several layers are selected, they are all deleted in one step. The layer below the deleted one becomes selected.
A document always keeps at least one layer, and locked layers cannot be deleted. Press Ctrl+Z to bring a deleted layer back.
#Change the stacking order
Layers higher in the list are drawn on top of layers below them.
#Drag in the list
Press on a row and drag it up or down. A line shows where the layer will land, and a hint near the pointer says "Drop above…", "Drop below…" or "Drop into folder…". Press Esc to cancel. On a touch screen, long-press the grip handle at the left of the row, then drag. The list scrolls when you drag near its top or bottom edge.
Dragging a selected row moves all selected layers together. Folders and clipping groups move as one unit.
#Use commands and shortcuts
| Command | Shortcut |
|---|---|
| Layer > Bring to Front | Ctrl+Shift+] |
| Layer > Bring Forward | Ctrl+] |
| Layer > Send Backward | Ctrl+[ |
| Layer > Send to Back | Ctrl+Shift+[ |
On a Mac, use ⌘ instead of Ctrl. With a layer row focused, Alt+↑ and Alt+↓ also move it, with Shift to go all the way. The same commands are in the row menu, in the Layer details panel (under More panels), and as the Raise layer and Lower layer buttons under the list.
#Move to an exact position
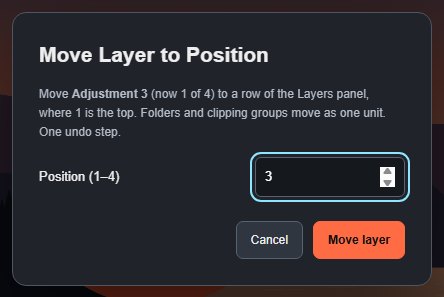
In a tall stack, choose Layer > Move to Position… (or Move to Position… in the row menu). Type a row number in Position, where 1 is the top of the list, and click Move layer. The move is one undo step.
Still stuck? See Troubleshooting or report a problem.