
Adjustment layers
Add a layer that applies Levels, Curves, colour and other adjustments to everything below it, without changing any layer's pixels.
An adjustment layer holds adjustment settings instead of pixels. It corrects the combined image of every visible layer below it in the stack. Use one when you want a single correction for the whole composition, or when you want to try a look and switch it off, fade it or remove it later.
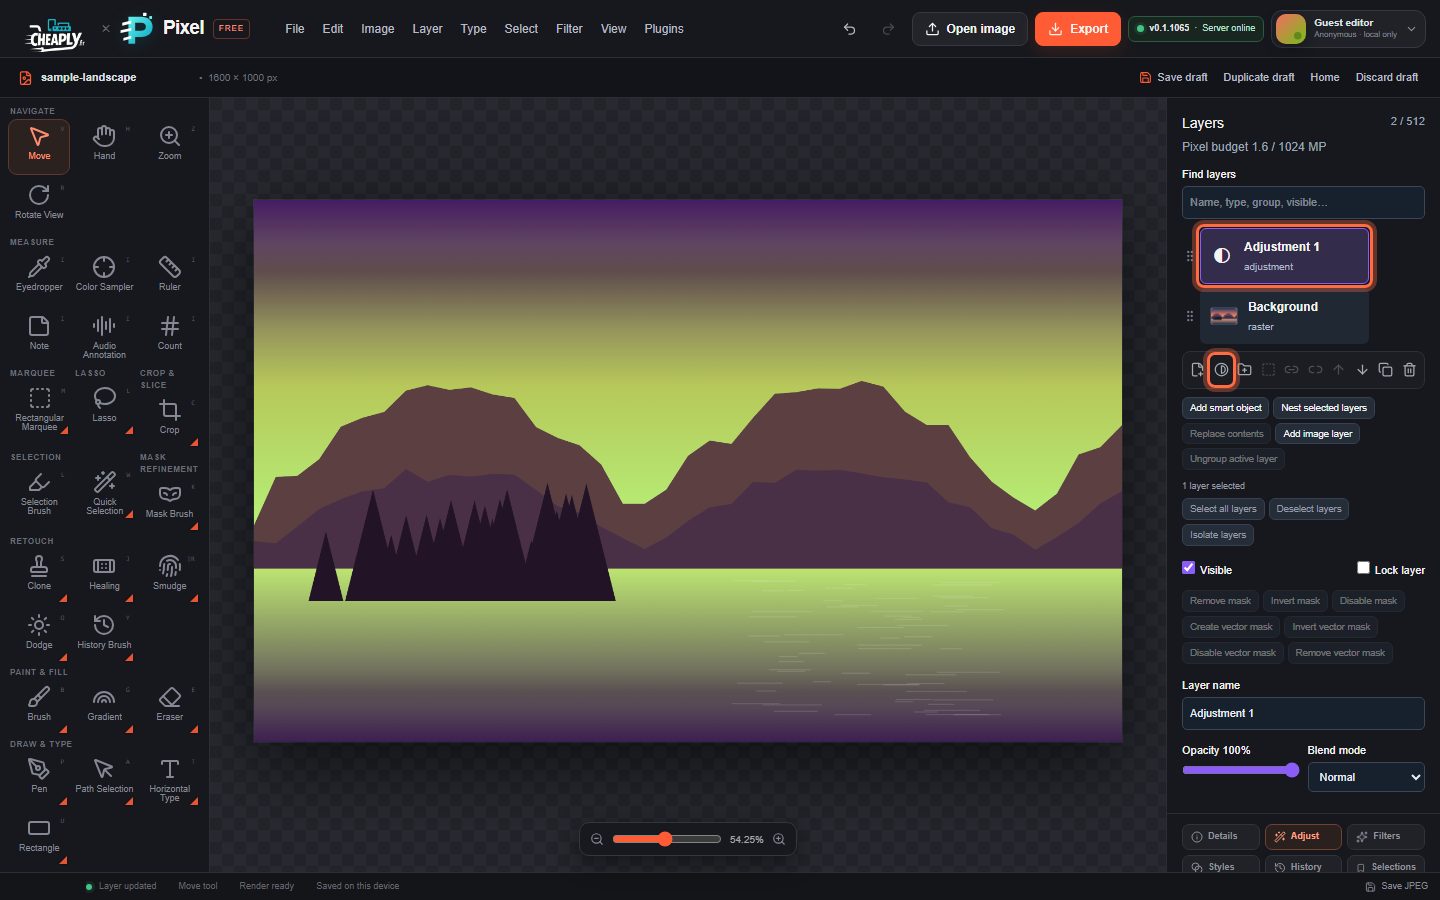
#Add an adjustment layer
- In the Layers panel, select the layer that the adjustment should sit above. The new layer is added above the selected layer.
- Click Add adjustment layer (the half-filled circle icon) in the row of layer actions, or choose Layer > New Adjustment Layer.
- A layer named "Adjustment 1" (or the next number) appears, and the Adjust selected layer panel opens.
- Set any of the adjustments: Levels, Curves, Hue/Saturation and Color Balance, Exposure, Vibrance, Black and White, Sharpen and Noise (Other adjustments), and the Brightness, Contrast and Blur sliders.
A new adjustment layer is neutral, so the image does not change until you move a control.
#Edit, hide or remove it
- Edit: select the adjustment layer and change its controls in More panels > Adjust. Its settings are kept until you change or reset them.
- Fade it: lower the layer's Opacity in the Layers panel.
- Blend it: choose a Blend mode for the layer to control how the corrected image is combined with the image below (see Blend modes and opacity).
- Hide it: clear the layer's Visible checkbox.
- Limit what it affects: move it in the stack. Only layers below it are corrected.
- Remove it: delete the layer. The layers below return to how they looked.
#Apply it to part of the image
An adjustment layer applies everywhere unless it has a mask:
- Paint it in or out with the Adjustment Brush. The first stroke creates a mask.
- Use a selection: make a selection, select the adjustment layer and click Mask from selection in the Layers panel (or choose Layer > Layer Mask). See Layer masks.
#Limits
- An adjustment layer affects every visible layer below it. Create Clipping Mask does not accept adjustment layers, so you cannot clip one to a single layer (Clipping masks). To limit it, mask it or move it in the stack.
- Auto Tone, Auto Contrast and Auto Color do not work on adjustment layers; they need a raster layer (Auto adjustments).
- Adjustment layers are kept in drafts and PixelForge project files. When you export an image, the correction is baked into the exported pixels.
Still stuck? See Troubleshooting or report a problem.