
Stroke a path with a brush
Paint along a path with the Brush, Pencil, Eraser or Smudge tool, with optional simulated pen pressure that tapers the ends.
Stroke Path with Brush paints your current brush along the curves of a path, onto a pixel layer. It is a quick way to get smooth, tapered lines that would be hard to draw by hand.
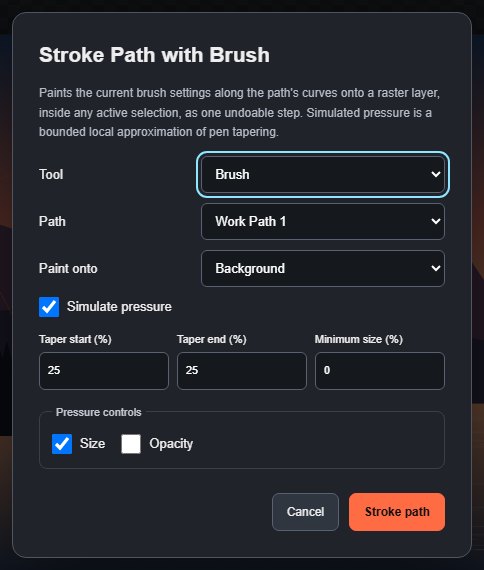
#Stroke a path
- Draw a path with the Pen tools. A work path (Pen mode: Path) is ideal.
- Set up the brush you want to paint with: colour, size, hardness and so on (see Paint with the Brush tool).
- Make sure there is a visible, unlocked pixel layer to paint on. Add one with Layer > New Paint Layer if you want to keep the stroke separate.
- Open the dialog: click Stroke Path with Brush… in the Tool options of any Pen or path tool, or choose Layer > Stroke Path with Brush….
- Choose the options below and click Stroke path.
The whole stroke is one undoable step. If there is an active selection, painting stays inside it.
#Options
| Option | What it does |
|---|---|
| Tool | Paint with the Brush, Pencil, Eraser or Smudge settings. |
| Path | The path layer to follow. When the document has more than one path layer, All visible path layers strokes every visible path at once. |
| Paint onto | The pixel layer that receives the paint. |
| Simulate pressure | Varies the stroke along its length as if drawn with a pressure-sensitive pen. On by default. |
| Taper start / Taper end (%) | How much of the stroke, at each end, fades in or out. Whole numbers from 0 to 100; default 25. |
| Minimum size (%) | The thinnest the stroke gets at the tips, as a percentage of the brush size. Default 0. |
| Pressure controls | Whether simulated pressure changes the Size (on by default) and the Opacity (Strength for Smudge). |
If there is no layer to paint on, the dialog says "Add or unlock a visible paint layer to stroke onto." and Stroke path stays unavailable.
To stroke the edge of a selection instead of a path, use Stroke a selection.
Still stuck? See Troubleshooting or report a problem.