
Filters overview
How filters work in PixelForge, what is in the Filter menu, and how to adjust, limit, stack and remove a filter without changing your original pixels.
Filters change how a layer looks: they blur, sharpen, distort, add noise or texture, or render new content such as clouds and light rays. Most filters in PixelForge are live: the filter is stored with the layer and drawn on top of the original pixels, so you can change its settings or remove it at any time. Your original pixels are never overwritten.
Every filter runs in your browser on your device. Nothing is uploaded, including the filters named "Neural" or "AI".
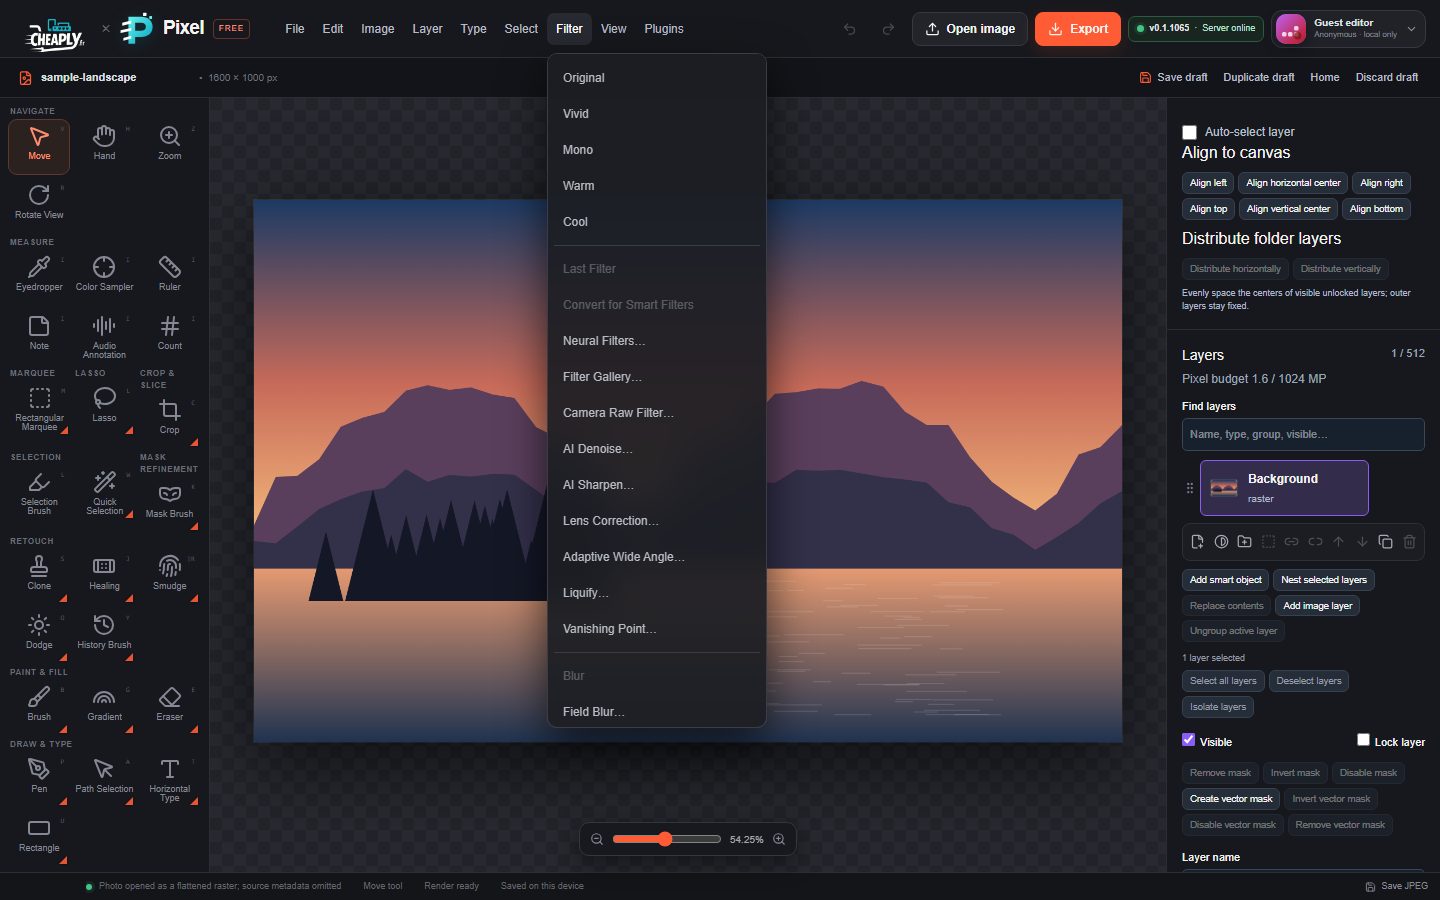
#Apply a filter
- In the Layers panel, select the layer you want to filter. It must be visible and unlocked.
- To filter only part of the layer, make a selection first (see Limit a filter to a selection).
- Choose a command from the Filter menu, for example Filter > Gaussian Blur…. The filter is applied straight away with its default settings.
- Open the Filters panel in the properties sidebar to fine-tune it. Its settings are in the Filter effects section.
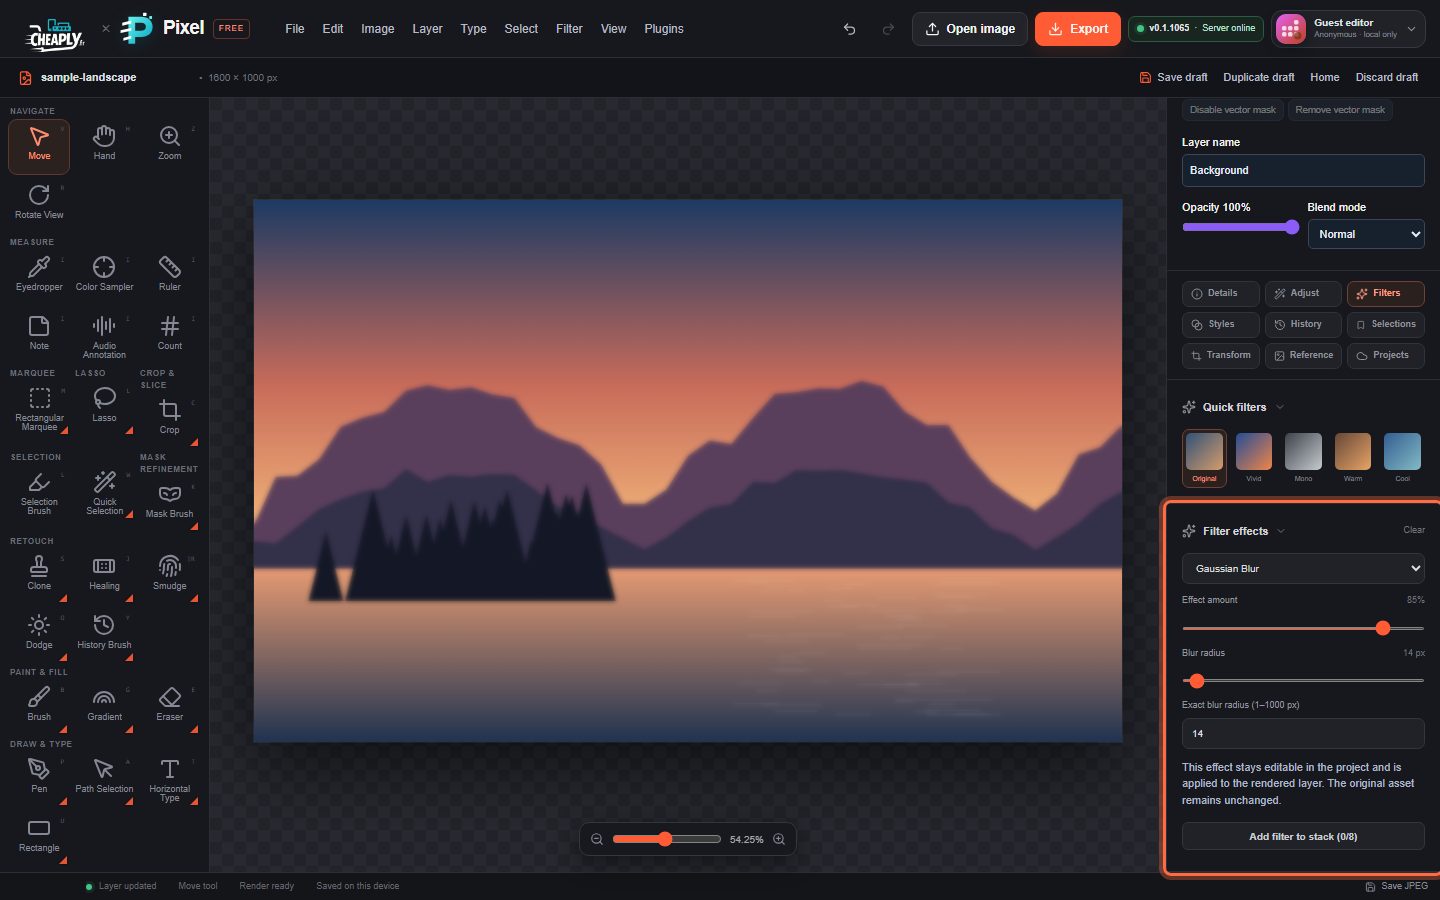
#The Filter effects section
| Control | What it does |
|---|---|
| Filter effect list | Shows the live filter. Pick another entry to switch to a different filter in place. |
| Effect amount | 0–100 %. How strongly the filter is mixed with the original layer. 0 % shows the layer unchanged. |
| Filter settings | Sliders, lists and fields for the chosen filter. Each readout shows its unit: pixels, degrees, a share of the layer (such as "% of shorter side") or a brightness level ("n / 255"). One-click filters such as Average, Blur, Despeckle, Sharpen and Solarize have no settings besides Effect amount. The settings are described in the article for each family. |
| Faded to (Edit → Fade) | Shown only after you use Edit > Fade… straight after applying the filter. 0–100 %: how much of the filter result is kept. 100 % removes the fade. See Fade an edit. |
| Filter center X (px) / Filter center Y (px) | For filters that have a centre (Twirl, Radial Blur, Lens Flare, Light Rays and others): the exact centre in layer pixels, in 0.1 px steps. |
| Clear | In the section header. Removes the live filter. Filter > Clear local filter effect does the same. |
| Add filter to stack (n/8) | Moves the live filter into the layer's filter stack so you can add another filter on top. See Smart filters and filter stacks. |
Each change is one step in History, so Ctrl+Z undoes it.
#Move a filter's centre on the canvas
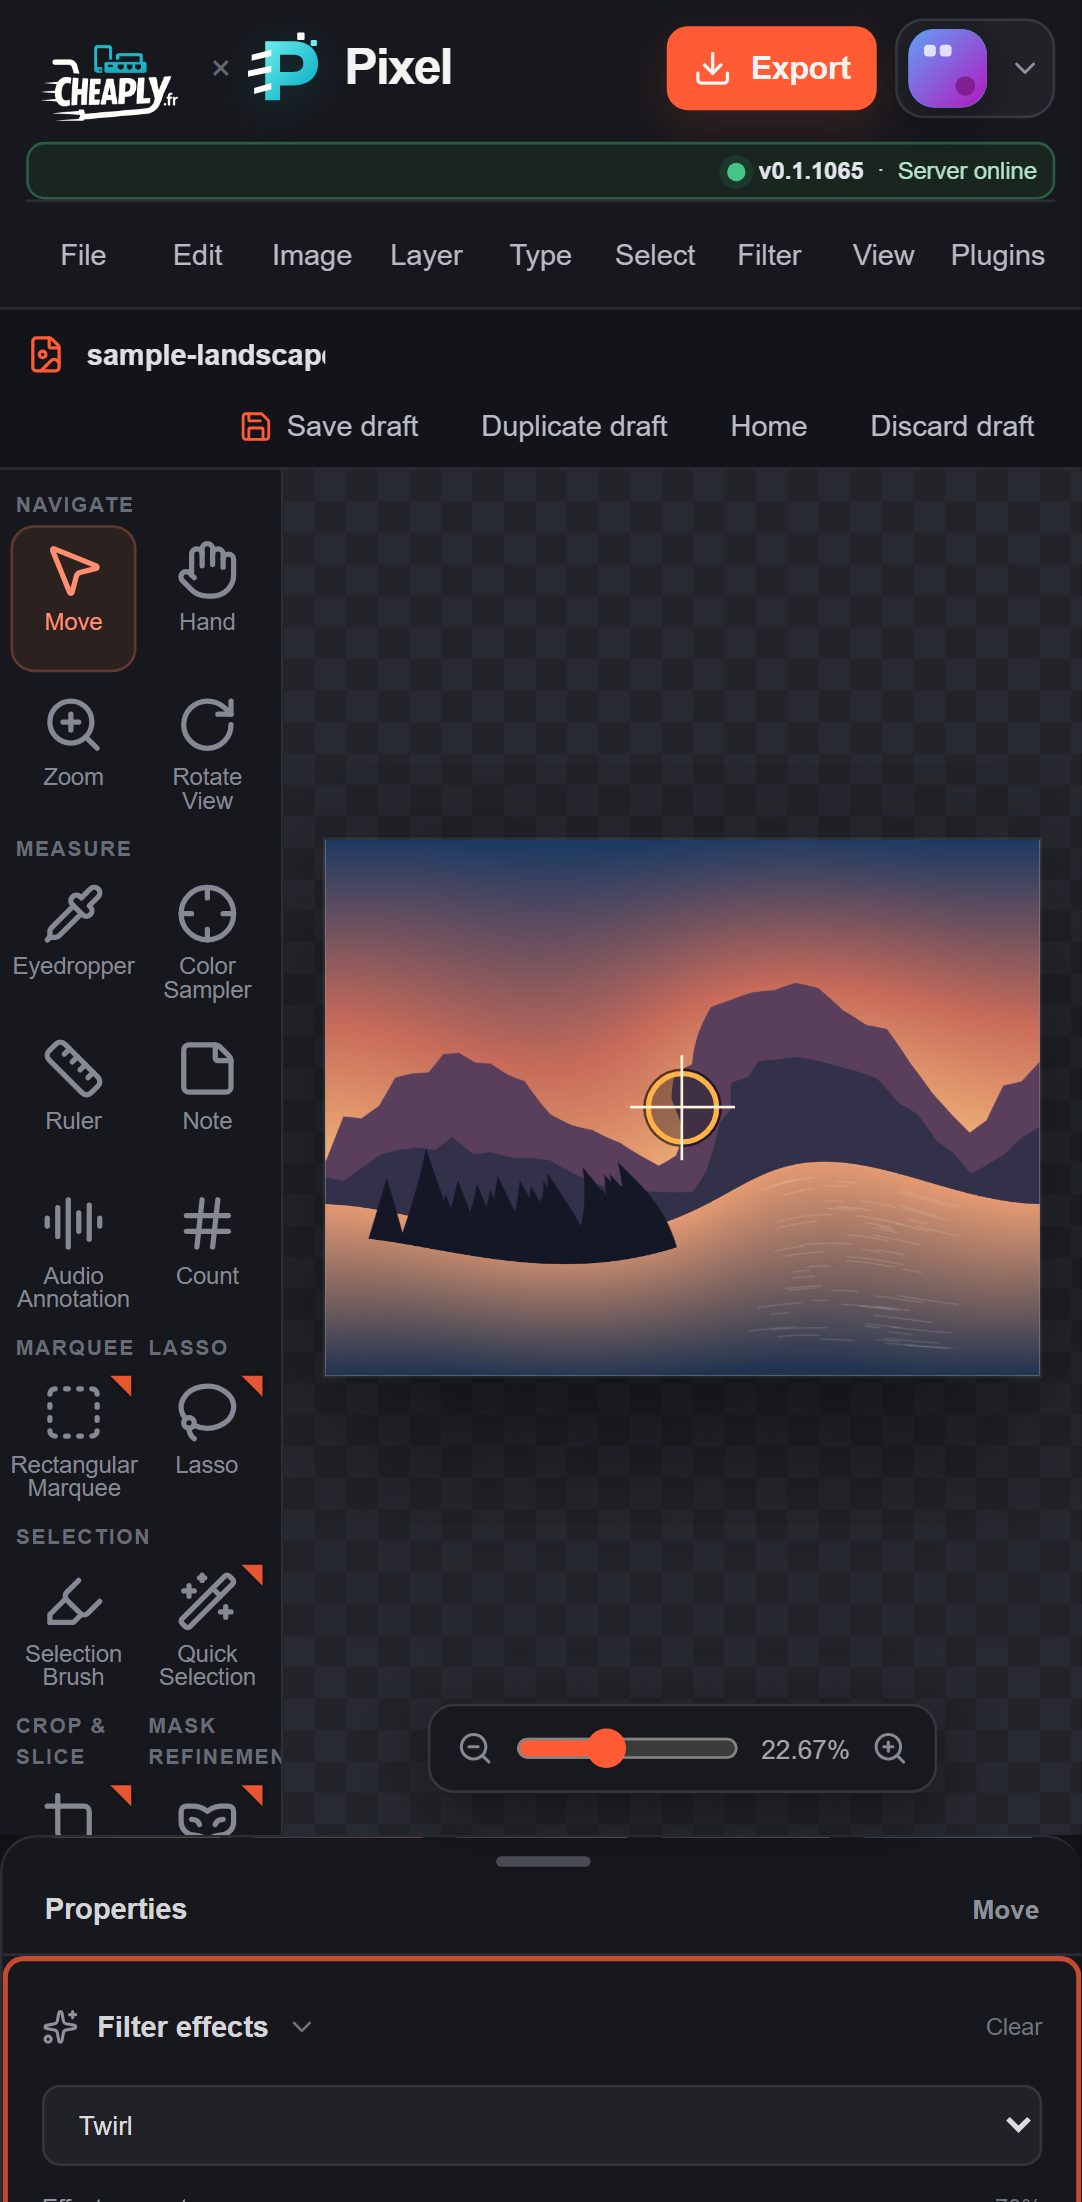
When a filter has a centre, a crosshair appears on the canvas while the Filters panel is open.
- Drag the crosshair to move the centre.
- Or click the crosshair to focus it, then use the arrow keys to move it one layer pixel at a time. Hold Shift to move ten pixels. Press Home to put it back in the middle.
#What is in the Filter menu
The Filter menu is one long list, grouped under grey headings.
| Part of the menu | Commands | Article |
|---|---|---|
| Quick filters | Original, Vivid, Mono, Warm, Cool | Filter Gallery and quick filters |
| Filter tools | Last Filter, Convert for Smart Filters | This article, Smart filters |
| Special filters | Neural Filters…, Filter Gallery…, Camera Raw Filter…, AI Denoise…, AI Sharpen…, Lens Correction…, Adaptive Wide Angle…, Liquify…, Vanishing Point… | Neural filters, Filter Gallery, Camera Raw Filter, Noise filters, Sharpen filters, Lens Correction, Liquify, Vanishing Point |
| Blur and Blur Gallery | Field Blur…, Tilt-Shift…, Average, Blur, Blur More, Box Blur…, Gaussian Blur…, Lens Blur…, Motion Blur…, Radial Blur…, Smart Blur…, Surface Blur…, Shape Blur…, Iris Blur…, Path Blur…, Spin Blur… | Blur filters |
| Distort | Displace…, Pinch…, Polar Coordinates…, Ripple…, Shear…, Spherize…, Twirl…, Wave…, ZigZag… | Distort filters |
| Noise | Add Noise…, Median…, Dust & Scratches…, Despeckle, Reduce Noise… | Noise filters |
| Pixelate | Color Halftone…, Crystallize…, Fragment, Facet…, Mezzotint…, Mosaic…, Pointillize… | Pixelate filters |
| Render | Picture Frame…, Tree…, Clouds, Difference Clouds, Fibers…, Lens Flare…, Light Rays…, Flame… | Render filters, Light Rays, Lens Flare |
| Sharpen | Sharpen, Sharpen Edges, Sharpen More, Smart Sharpen…, Unsharp Mask… | Sharpen filters |
| Stylize | Find Edges…, Emboss…, Solarize…, Diffuse…, Wind…, Gradient Map… | Stylize and video filters |
| Video | De-Interlace…, NTSC Colors | Stylize and video filters |
| Other | High Pass… | Sharpen filters |
| Clean-up | Clear local filter effect, Clear Smart Filter Stack | This article, Smart filters |
#Limit a filter to a selection
If a selection is active when you choose a filter, the filter changes only the selected pixels. A feathered selection gives a soft transition.
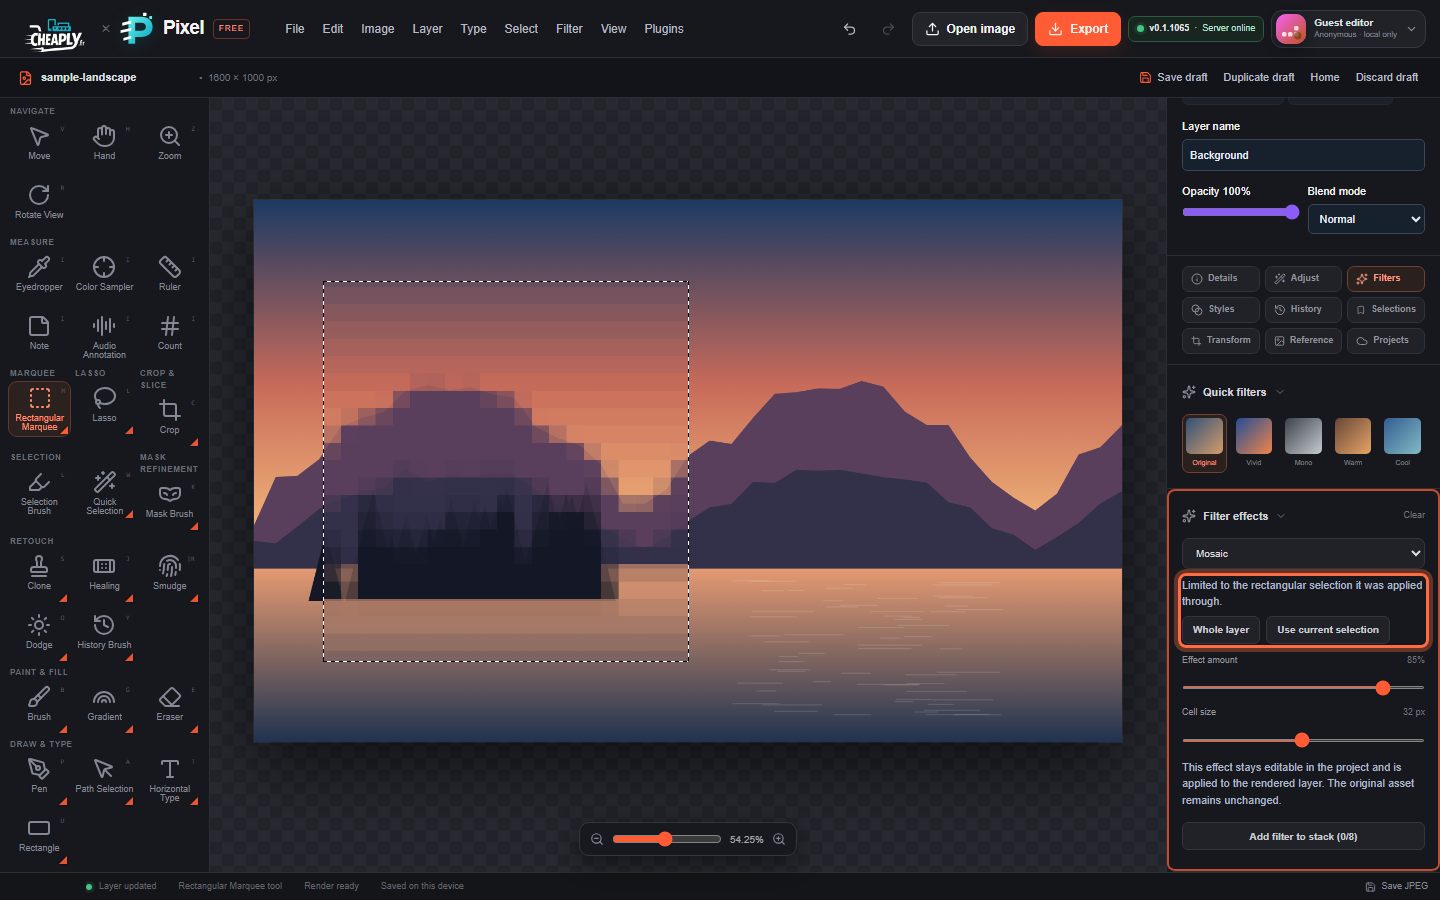
The filter stays live and remembers the selection it was applied through. The Filter effects section then says "Limited to the … selection it was applied through" and offers two buttons:
- Whole layer removes the limit, so the filter covers the whole layer.
- Use current selection replaces the stored area with the selection you have now.
Selections made with the Rectangular, Elliptical and Lasso tools can limit a filter. Colour-based selections (Magic Wand, Quick Selection, Color Range) cannot limit a live filter yet: the filter then covers the whole layer and the status bar says so.
#Apply more than one filter
A layer has one live filter at a time. When you choose a different filter from the Filter menu on a raster layer or smart object, the current live filter moves into the layer's filter stack and the new filter is applied on top, in one undo step. A stack holds up to eight filters. See Smart filters and filter stacks.
#Last Filter
Filter > Last Filter applies the last filter you chose again, on the active layer, with that filter's default settings. It is greyed out until you have used a filter. Use the Filter effects controls afterwards to set its values.
#Remove a filter
- To remove the live filter, click Clear in the Filter effects header, or choose Filter > Clear local filter effect.
- To remove every stacked filter, choose Filter > Clear Smart Filter Stack.
- Undo also works: each filter change is one History step.
#Filters that change pixels directly
Two commands in the Filter menu are not live:
- Vanishing Point… writes a new version of the layer's pixels. Undo restores the original. See Vanishing Point.
- Camera Raw Filter… is stored with the layer's photo adjustments, not in the Filter effects section. See Camera Raw Filter.
#Performance
Filters are calculated on your device. Large layers and big radii take longer; the status bar shows when the canvas is rendering. If a document becomes slow, see Large documents and Performance tips.
#On a phone
On a phone, the Filters panel opens in the properties sheet at the bottom of the screen. Drag the sheet up to see all the controls.
Still stuck? See Troubleshooting or report a problem.