
Auto Tone, Auto Contrast and Auto Color
Fix tone, contrast or a colour cast in one click with the Image menu's automatic corrections.
The Image menu has three one-click corrections. Each one analyses the selected layer and applies a correction that stays editable: the layer's original pixels are kept.
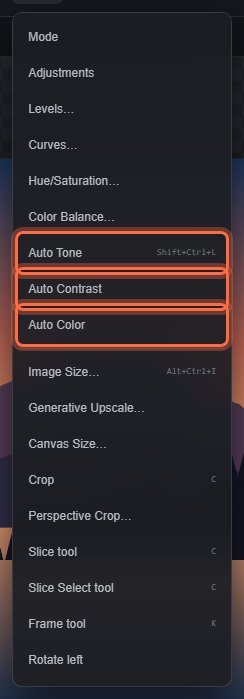
#Apply an automatic correction
- Select a raster (image or paint) layer in the Layers panel. The layer must be visible and unlocked.
- Choose one of:
- Image > Auto Tone (Shift+Ctrl+L)
- Image > Auto Contrast
- Image > Auto Color
- The status bar confirms, for example "Auto Tone applied; the correction remains editable".
#What each one does
| Command | What it does | Best for |
|---|---|---|
| Auto Tone | Stretches the red, green and blue channels separately so each one spans the full range from dark to light. | Flat photos; it can also remove a colour cast, because each channel is stretched on its own. |
| Auto Contrast | Finds the darkest and brightest tones and stretches all channels by the same amount. | Adding contrast without changing colours. |
| Auto Color | Balances the average of the red, green and blue channels so the image averages out to neutral grey. | Removing a colour cast, for example from indoor lighting. |
Only visible pixels are analysed; fully transparent areas are ignored. You can turn on more than one; they are always applied in the order Tone, Contrast, Color.
#Undo or remove a correction
- Use Edit > Undo right after applying it.
- Later, open More panels > Adjust and click Reset to remove all adjustments from the layer, including the automatic ones. Note that Reset also clears the layer's other adjustments and filters.
#Good to know
- Choosing the same command again does nothing; the status bar says it is already enabled.
- If the layer already uses the full tonal range, the command reports that it found no usable range and makes no change.
- Automatic corrections work on raster layers only. With an adjustment layer selected, the three commands are greyed out. To correct several layers at once, merge them first (Merge and flatten) or use an adjustment layer with manual Levels.
- The analysis is limited to 16 megapixels. On a larger layer the command reports that it could not be applied.
Still stuck? See Troubleshooting or report a problem.