
Stylize and video filters
Turn a photo into edges, relief or posterised colour with Find Edges, Emboss, Solarize, Diffuse, Wind and Gradient Map, and clean up video frames with De-Interlace and NTSC Colors.
The Stylize filters change a picture's look rather than correcting it. The Video filters fix two problems common in frames captured from video. All of them are live filters that you can edit or remove later. See Filters overview for the basics.
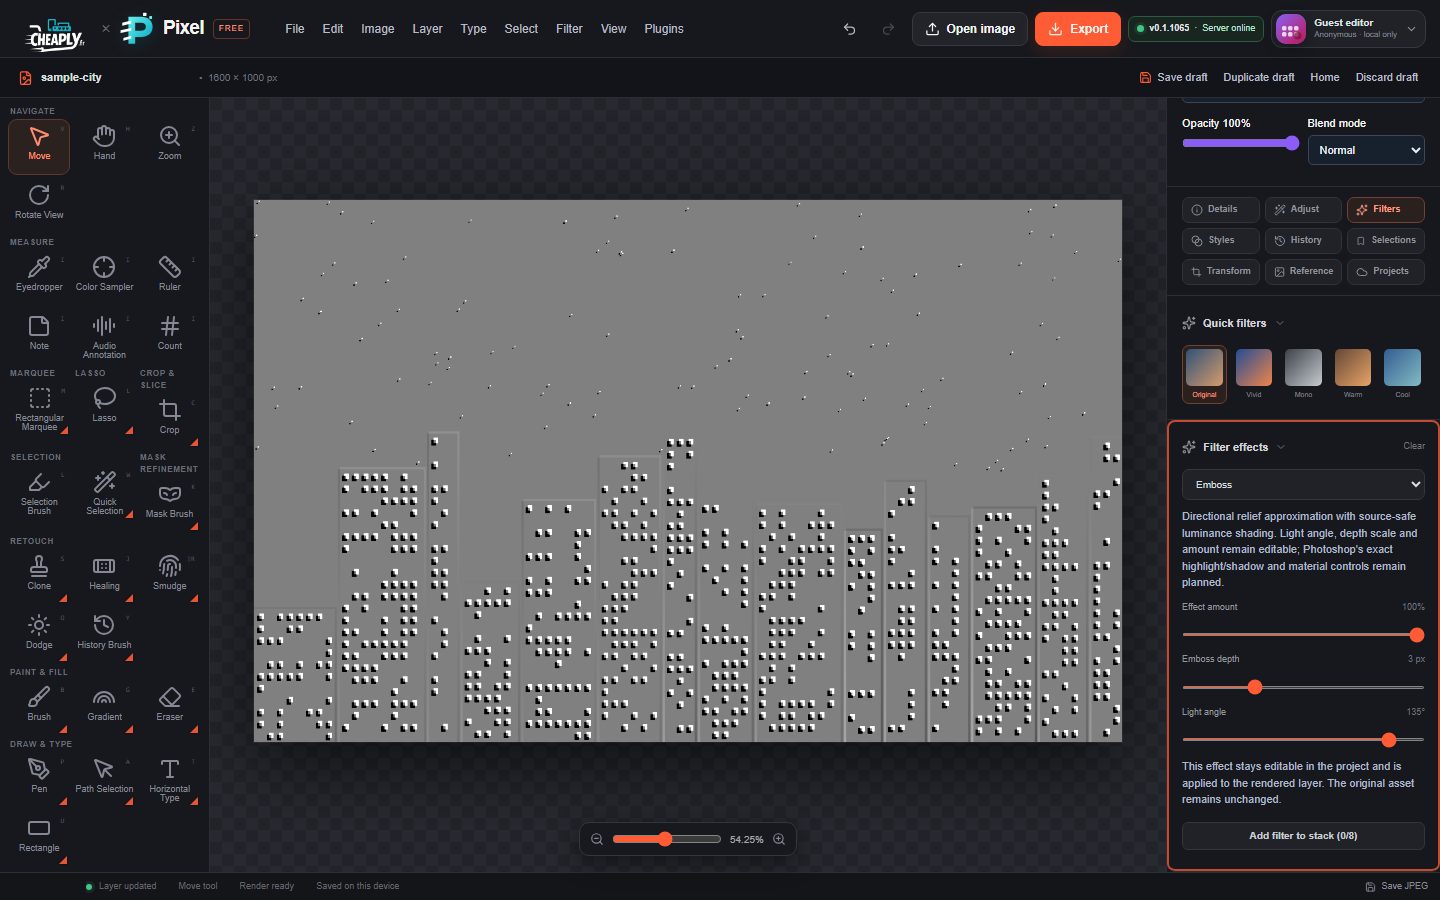
#Apply a filter
- Select a visible, unlocked layer.
- Choose a command from the Stylize or Video part of the Filter menu.
- Open the Filters panel and adjust Filter effects.
Every filter here has Effect amount (0–100 %), which mixes the result with the original layer.
#Stylize
#Find Edges
Finds the brightness edges in the picture and shows them as lines. It has only Effect amount (default 100 %).
#Emboss
Turns the picture into a grey relief, as if it were pressed into metal, lit from one side.
| Option | Range | Default | What it does |
|---|---|---|---|
| Emboss depth | 1–8 px | 1 px | How far apart, in pixels, the samples that form the relief are. Higher values give a deeper, broader relief. |
| Light angle | −180° to 180° | 0° | Direction the light comes from. |
| Effect amount | 0–100 % | 70 % | Strength of the relief. |
#Solarize
Inverts the tones brighter than mid-grey, giving the partly negative look of a solarised print. It has only Effect amount (default 70 %).
#Diffuse
Mixes each pixel with the pixels at a set distance above, below, left and right of it, giving a soft, doubled look. The result is not random.
| Option | Range | Default | What it does |
|---|---|---|---|
| Radius | 1–64 px | 6 px | Distance to the pixels that are mixed in. |
| Effect amount | 0–100 % | 70 % | Strength of the mix. |
#Wind
Smears pixels in one direction, like streaks of wind.
| Option | Range | Default | What it does |
|---|---|---|---|
| Radius | 1–64 px | 6 px | Length of the streaks. |
| Wind angle | −180° to 180° | 0° | Direction of the wind. |
| Effect amount | 0–100 % | 70 % | Strength of the streaks. |
#Gradient Map
Replaces each pixel's brightness with a colour from a gradient: dark tones get the shadow colour, light tones the highlight colour. Use it for duotones and colour grading.
| Option | Range | Default | What it does |
|---|---|---|---|
| Shadow colour | any colour | black | Colour for the darkest tones. |
| Highlight colour | any colour | white | Colour for the lightest tones. |
| Gradient Map blend mode | Normal, Multiply, Screen, Overlay | Normal | How the mapped colours combine with the layer. |
| Interior colour stops | up to 6 stops | none | Add stop inserts a colour between shadow and highlight. Each stop has a colour and a position from 1 to 99 %; Remove deletes it. |
| Effect amount | 0–100 % | 70 % | Strength of the effect. |
With the default black-to-white gradient and 100 % amount, Gradient Map gives a black-and-white picture. For tonal corrections, see Adjustments overview.
#Video
#De-Interlace
Interlaced video stores odd and even rows from two slightly different moments, which shows as comb-like lines on moving objects. De-Interlace keeps one set of rows and rebuilds the other.
| Option | Choices | Default | What it does |
|---|---|---|---|
| Keep field | First field (rows 1, 3, 5…), Second field (rows 2, 4, 6…) | First field | Which set of rows to keep. |
| Reconstruct rows | Interpolate adjacent rows, Duplicate nearest upper row | Interpolate | How the removed rows are rebuilt. Interpolate is smoother; Duplicate keeps hard edges. |
| Effect amount | 0–100 % | 100 % | Mix with the original. |
It works on a single frame, so it cannot recover motion between the two fields.
#NTSC Colors
Lowers colours that are too saturated for television while keeping their brightness and the layer's transparency. It has only Effect amount (default 100 %). It is an approximation, not a broadcast compliance check.
Still stuck? See Troubleshooting or report a problem.